Showing posts with label Tips and Tricks. Show all posts

Tuesday, May 22, 2018

How to Draw a Mandala

Want to learn how to draw a mandala?
Follow these steps and you'll be well on your way.

Gather your supplies


*Compass, protractor, and ruler:  These will help you make the guidelines for your mandala.

*Pencil and eraser:  I use these to draw and erase the guidelines.

*Pens:  My favorite pens are Micron and Staedtler fineliners.

*Paper:  Use whatever paper works well with your pens.


Draw some concentric circles


This is where you will use your compass.  You have two choices: draw the circles with pencil and erase them later or draw the circles with your pen.  Sometimes I use my ruler to evenly space my concentric circles.  Other times I draw without measuring, like in this picture.  


To add variety to your mandala try spacing some circles further away and some closer together.

Draw some guidelines


Use your protractor, ruler, and pencil to draw some guidelines.  I usually split my circles up into 8 equal sections.  These guidelines help when you are placing petals in your circles.

Just place your protractor so that the 90 degree line and the 0 degree line meet at the center of your circles.  Mark 0, 45, 90, 135, and 180 degrees and connect the marks using your ruler and pencil to draw a line.  Repeat for the other half of the circles.  You now have divided your mandala into 8 equal sections.


Add petals to the rings of your mandala  


Your petals can be pointed or rounded, or a combination of the two.  Use your guidelines to space your petals evenly around the circles.


Add details  

Now for the fun part!  Grab some colored pens (or stick with black if you prefer) and draw some simple designs and decoration to, and around, your petals.  


I love to look at Instagram and Pinterest and fill sketchbook pages with what I call "Mandala Filler."  When I am ready to decorate my mandala, I look back at those sketchbook pages for inspiration.  It somehow makes the whole process less intimidating.


I hope you enjoyed this post and use it to start creating your own mandalas!

Tuesday, June 7, 2016

Tips and Tricks: How to Make Doodle ATCs

Here's another installment of Tips and Tricks Tuesday.  I'd like to make this a regular feature on the blog some day.  Today I am going to show you how I made a series of 10 doodle ATCs, or Artist Trading Cards.

Step 1
Grab a sheet of white cardstock and randomly color it with markers.  I used my Chartpak Ad Markers, but any markers will work.
A photo posted by Lisa (@lalocadesigns) on
Step 2
Start doodling with a pen color that will show over all the colors.  I used a black pen and some tangles from the Tangle Patterns website.  Cover the whole sheet of cardstock with the doodles.
A photo posted by Lisa (@lalocadesigns) on
Step 3
Measure and cut the cardstock into 10 rectangles that measure 2.5" by 3.5". 

A photo posted by Lisa (@lalocadesigns) on
Step 4
Protect the doodles with Mod Podge or a varnish and add artist information to the back of the ATCs.

A photo posted by Lisa (@lalocadesigns) on
Voila.  You now have 10 beautiful doodle ATCs to share with friends or strangers.

 Do you make ATCs?  Do you doodle?
Have you ever made anything like this project?

Tuesday, January 12, 2016

Tuesday Tips and Tricks: Art Journal Websites

I started an art journal in 2015 and I love it!  I have finally reached the point in my life where I do not need perfection from my art; the process is more important.  I find it very relaxing to create Zentangle-inspired art, collages, and to play with new techniques.  If you are interested in starting an art journal, there are many great websites that can help and inspire you.  Here are some of my favorites:

Tangle Patterns:  This website has a huge collection of step-outs for Zentangle tangles.  When I first heard about Zentangle, I had a really difficult time finding instructions for any of the tangles.  Now I go to this website and browse for random tangles to draw.

Sometimes you just need a prompt or a theme to get you started.  Journal 52 and Art Journal Journey are two websites that post weekly and monthly prompts respectively.  Journal 52's current prompt involves things you plan to say "yes" or "no" to in 2016, and Art Journal Journey has the prompt Winter Wonderland.  These prompts give you a starting point and looking at what others create in response to the prompt can be very inspiring.


This weekend I subscribed to a great Youtube channel: Art ala Carte, and I am obsessed.  So many playlists, so much to learn.  Yesterday I spent some time learning how to better use my new colored pencils and today I spent some time learning how to draw cats.  Her videos are easy to follow.  I actually drew a cat!  Check it out:

Do you have any favorite art journal websites? 

Tuesday, January 5, 2016

Tuesday Tips and Tricks: Crafty Websites

This week I thought I would share a few of my favorite crafty websites.

Community
If you are looking for a supportive community, Ravelry and Craftster are two great options.

Ravlery is a community for knitters and crocheters.  I love the My Notebook tab where I can keep track of my projects and stash and keep a queue of patterns I want to try.
The forums are a fun place to show off your work, join challenges, and have conversations about yarn.  Also, Ravelry has a lot of patterns to search through, many of them free.

Craftster
Craftster is a community for all crafters with forums for many different topics.
I love going to Craftster for inspiration and to remind myself that you can make things no matter what materials you have on hand.  People on Craftster share tutorials and unique ideas.  There are also interesting challenges, like the Harry Potter Craftalong


Patterns
I love looking for new patterns, and two of my favorite sites for patterns are Knitting Pattern Central and Crochet Pattern Central.  So many different options!

Where do you go for crafty inspiration and community?

Tuesday, December 29, 2015

Tuesday Tips and Tricks: New Year's Goals

Most of us have heard the following quote:

...but I really like plans and goals.  They give me a purpose, something to reach and work for.  Every year I make goals for different areas of my life and I post them on my blogs for everyone to see.  I work all year on those goals: some I achieve and some I do not.

The past two years I have not met any of my crafty goals.  I believe that there are three reasons for not reaching my goals: 
1. They are not specific.
2. They are not attainable.
3. There is no plan to achieve the goal.

For example, one of my goals for 2014 and 2015 was "Start an Etsy store."  It sounds like a great goal.  Lots of people have done it before me.  It should be easy.  Unfortunately, the goal is not specific and has no plan attached.  I need to answer a lot of questions and do a lot of planning before I can actually start an Etsy store.  For one thing, I need stock to sell.

Another goal of mine was to complete a sweater, an afghan, and a skull shawl while also completing all the other projects that I pick up throughout a year.  That goal is unattainable for me, and I know it.

It's funny... at work I set attainable and specific goals using the SMART goal formula.  

S = Specific
M = Measurable
A = Attainable
R = Relevant
T = Time-bound

Going through the 5 parts of a SMART goal forces you to create a plan to help you achieve the goal.  This year I will be using the SMART goal formula when setting my New Year's goals.

Here are my goals for 2016:
1.  Each month, choose three projects to focus on: one personal, one gift, one to sell
I do not have to complete the three projects in one month.  I just want to focus on three specific projects each month.  Hopefully this will help me to build up stock for a future Etsy store or future craft fairs while also allowing me to gift handmade items throughout the year.  I am also hoping this will help me finish some projects instead of just continually starting new projects.

2.  Each month, choose one project from my Pinterest boards
When I am choosing the projects I want to focus on each month, I will consult my Pinterest boards.  I have been collecting ideas for gifts, for myself, and for items to sell for years now.  Now it is time to follow through with some of those plans.

3.  Each week, stick to my blogging schedule: Tuesday Tips and Tricks, Thursday Peek in my Art Journal, Friday FO
I have been following this schedule for a little while now and I like it.  It is not too much and it gives me opportunities to build community and share my crafty experiences.

4.  Teach a crochet class
I am working on the Craft Yarn Council Crochet Instructor Program and have been student teaching.  I am now looking forward to putting my new knowledge into practice.  I plan to approach my local yarn store about teaching a beginning crochet class.  If that does not work out, I will approach other local organizations and groups.  I want to teach.

5.  Send all birthday gifts on time
I have a very bad habit... I am almost always late with birthday gifts, like months late.  This year I want everyone to receive their gifts on time, hopefully with something handmade included.  

My word for the year is... Achieve.  I will achieve all the goals :)


Have you made goals for 2016?  Have you made SMART goals?

Tuesday, December 15, 2015

Tuesday Tips and Tricks: Quick Holiday Gifts

If you are anything like me, you often find yourself running around last minute trying to make/put together gifts for family and friends.  Whether it's a birthday, Christmas, or some other gift-giving occasion, I always seem to run out of time... so I like to have some quick and easy gifts I can turn to and make in a pinch.

Fingerless Mitts are a great, speedy gift.  Two patterns that I love are Danyel Pink Designs' Crochet Wrist Warmers...

...and Daphne Bekiari's V-Stitch Fingerless Gloves.
One is crocheted flat and seamed; the other is crocheted in the round.  Both are quick and easy and make great last-minute gifts.


Cowls, or infinity scarves, are another great last-minute gift.  Just choose your favorite stitch pattern, crochet or knit a flat strip, then seam it up.  Or you can knit or crochet in the round.  One of my favorite gift cowls is Jane Richmond's Marian Cowl.
I've already knit 5 of these cowls and I don't plan to stop.  Big needles and bulky yarn make it a quick and easy knit.


Earwarmers are another great gift.  I really like the Valentine Romance Headband.
It is a quick, easy crochet project and is easily jazzed up with some bling.  I found these crystals in the jewelry department of the craft store, but you could also crochet some flowers or motifs, add pretty buttons... the options are endless.


Well, I better get back to making my last minute gifts.  Hopefully I have inspired you to pull out your hook or your needles and get some gifts together.

Tuesday, December 8, 2015

Tuesday Tips and Tricks: Temperature Scarf

With a new year approaching, I am already thinking of interesting projects to start, so when I saw a recent post by Underground Crafter about her temperature scarf, I was enthralled.  I immediately did a quick search of FOs on Ravelry.  Just look at some of the beautiful results that I found:
The temperature scarf is a project that involves knitting or crocheting one row or motif every day based on the low/high temperatures.  By the end of the year, you have a unique project that records a year of weather history.  Knitters and crocheters have interpreted this idea in so many ways: cowls, hats, blankets, etc.  It is amazing to me how the random color combinations work so well together.

If you are thinking about starting a project like this, Marie from Underground Crafter offers some great tips:

*Choose your project carefully.  Different project and stitch combinations should be considered carefully to make sure they go well together.

*Choose yarns with similar care instructions.  She even suggests choosing yarns from the same company because the colors tend to go together better.

*Create a color key.  Once you decide on a project and yarn colors, create a key of which yarn colors correspond with which temperature ranges.  

Most importantly, Marie reminds us to not give up.  While it may be overwhelming to crochet/knit one row every day, it might be easier to complete 30 rows at the end of each month.


Have you ever tried a temperature project?
Will you try one this year?

Tuesday, October 20, 2015

Tips and Tricks Tuesday: Sizing a Crochet Hat

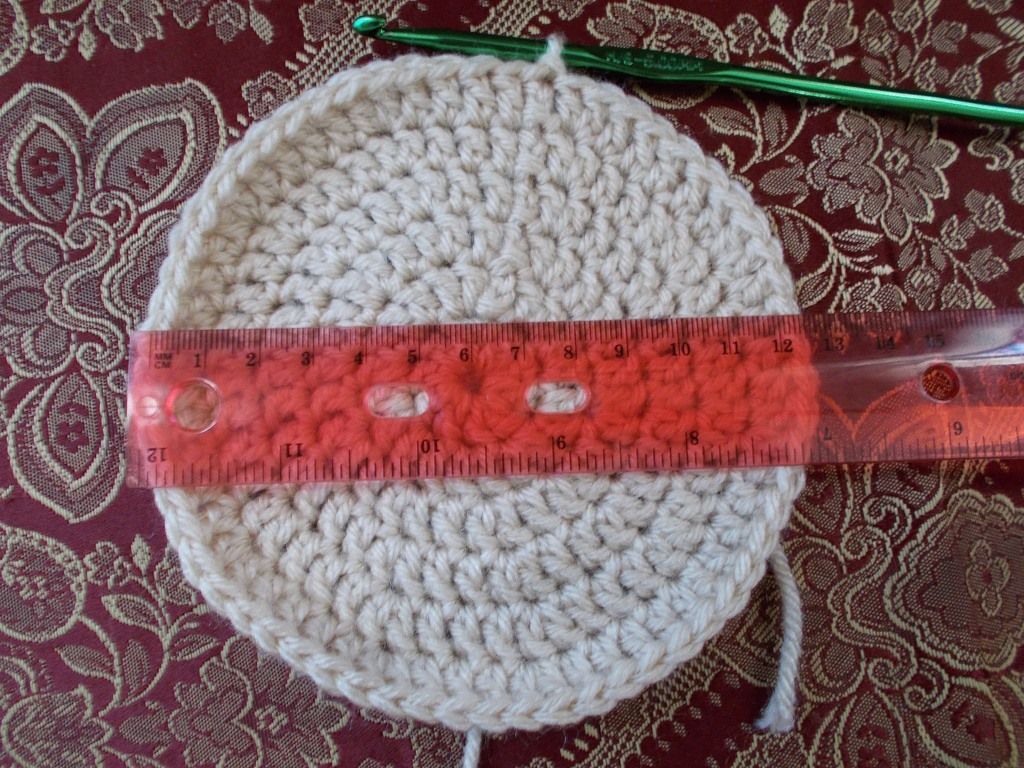
This summer, I crocheted a lot of hats.  It got me thinking about an accurate way to size a hat.  Usually I try things on a lot when I am crocheting, but my head is not always a good reference point.  This summer I was crocheting for babies and men, so I needed a different way to measure the size.  I had to use math.

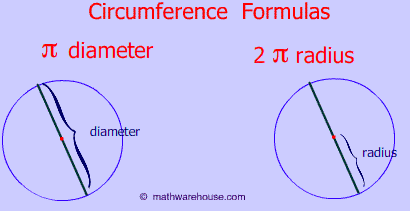
Technically, a hat is a circle, and the outer boundary of the circle, or circumference, should fit around the person's head.  So the question was:  how can I calculate what the circumference of my finished hat will be?

The answer is to use the formula for calculating circumference: diameter(π). 
 Knowing that π = 3.14, we can use this formula to figure out what diameter is needed to get the necessary circumference.  First, I needed to measure the head.  I cut a string and measured where I wanted the brim of the hat to sit on the person's head.  When I measured that string, I knew what the circumference of the completed hat needed to be.  I then plugged it into the formula.
Circumference = 39.5 cm
39.5cm = diameter(3.14)
12.5796cm = diameter
Remembering that most yarns will stretch a little, I crocheted my initial circle to a little less than the actual measurement and then continued with my hat.  I used this same method to size some baby hats after mommy sent me some head measurements.  This simple math trick can help you easily size crochet hats for anyone.

Have you ever used this trick to help size a crochet hat?